

This is my review of the File Transfer Protocol (FTP) feature on a Lorex 4K IP Camera System. 1
Here is a quick way to review snapshots taken during motion detection events. I used the File Transfer Protocol (FTP) feature of the Lorex NVR. Basically I set the NVR to transfer snapshots to my web server, then I wrote a script that displays them. This is an advanced topic intended for those who manage their own website. Here’s how I did it. 2
Create an FTP Account
First create an FTP account at your website hosting provider and create a user name and password. Set the root directory to be a directory under your “public_html” directory. This allows you to view the uploaded snapshots over the Internet. You will want to restrict access to that directory using “.htaccess,” either by requiring a password, or restricting it to only certain Internet Protocol (IP) addresses.
The Lorex documentation suggests you download and install FTP server software on your computer. If you don’t have a web server, you can do that instead. But, it means you must keep a computer on your local network running all the time. You must also use a package like XAMPP if you want to run a PHP script on your local PC. It has an Apache server.
Enable FTP on the NVR
On your NVR, navigate to Network, FTP options. Enter your FTP server address, which is usually something like “ftp.yoursite.com.” Enter the port number, usually 21, and the user name and password you chose when you created the FTP account at your server.
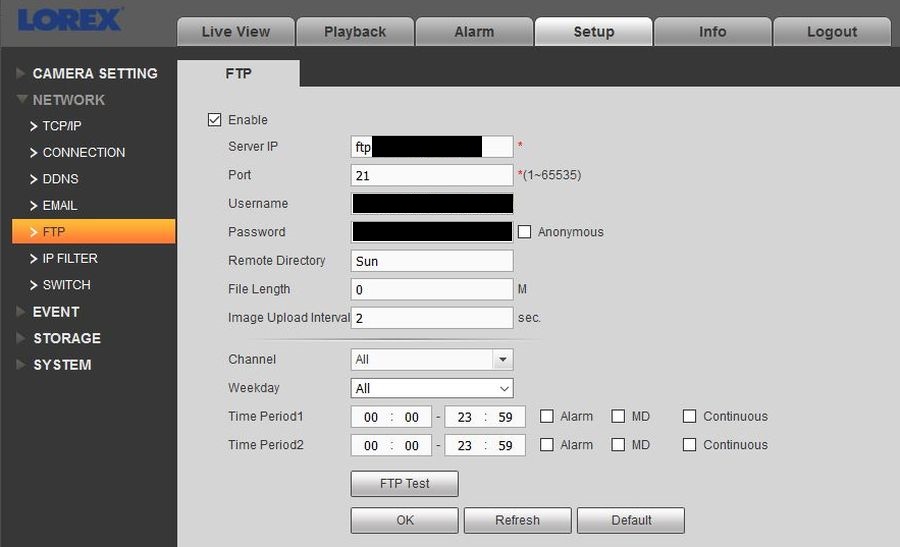
Optionally specify a Remote Directory. The NVR automatically creates a directory structure in your root FTP directory, or under the Remote Directory name you choose. Here for example, I named the directory “Sun” and the NVR created a sub-directory using the NVR’s IP address as it is on my Local Area Network (LAN). It then creates sub-directories under that directory, one for each day. That’s where the snapshots uploaded are stored.

Keep the File Length at 0 to allow files of any size to be uploaded. Alternately you could cap the maximum length based on what you expect it to be. That depends on the snapshot image resolution and quality level. If you normally get 1 Megabyte files at quality level 4 out of 6, then you could enter 2 Megabytes. Daylight images are usually larger than nigh time images.
Choose a particular Channel (camera number) or all cameras. It’s either all or one, you cannot choose combinations of cameras. Then choose the weekday when FTP uploads are done, or all weekdays. Likewise, you cannot choose a combination of individual weekdays. 3
Leave the check boxes for “Alarm,” “MD,” and “Continuous” unchecked. That way, only snapshot images will be uploaded. If you check a box, then video will be uploaded as well, which results in enormous file sizes. Your Internet provider probably severely restricts your upstream bandwidth. I noticed that if I enabled video upload over FTP, my Internet browser became very sluggish.
Check the box for Enable to start FTP processing. Once FTP is enabled, as motion events occur, the snapshots generated will be transferred via FTP to your website.
There seems to be a bug in the Lorex NVR. One night I disabled FTP uploads. The next morning when I enabled them again, no snapshots were being uploaded. I checking the settings on my web server, and I was able to manually transfer files. I restarted the Lorex NVR and the snapshots began to transfer once again.
Snapshots for Motion Detection Events
Use these steps to enable snapshots for motion detection events, if you have not already done so.
Navigate to Camera Setting, Recording, Snapshot. Choose the desired Channel (camera number). Choose the “Trigger” Mode so that snapshots are triggered on motion detection events. “Timing” mode refers to continuous snapshot recording, which is not what you want when using FTP transfer.
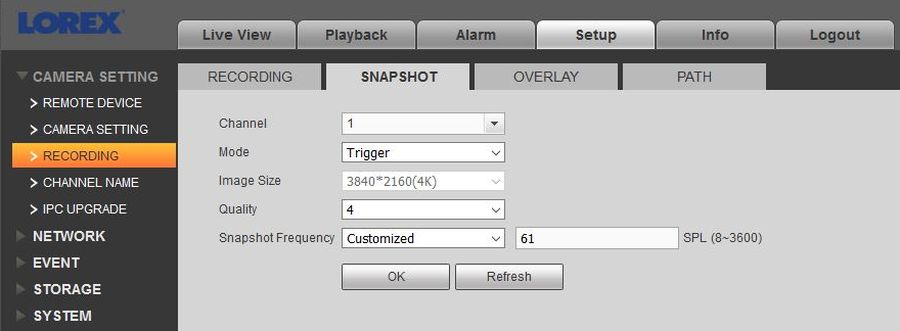
Choose an image Quality. This will require some experimentation. At the best quality, level 6, snapshots are over 2 Megabytes in size during daylight hours and about 1 Megabyte during night time hours. At the lowest quality, level 1, they are less than 1 Megabyte and less than a ½ Megabyte, respectively. But, the lowest quality snapshots at night are almost useless in terms of being able to detect people or cars.
It depends on why you want to use snapshots. If you want a record of what the camera sees, you’ll want higher quality. If you want to see enough to decide whether to review the video playback, you can get by with lower quality. It’s a trade-off between disk storage capacity, transfer bandwidth, and image resolution.
Snapshot Frequency is poorly documented. I’ve yet to figure out what the abbreviation “SPL” stands for, but it is probably “Seconds Per” something, or “Snapshots Per” something. You can think of it as “Seconds Per Snapshot.” The camera starts taking snapshots when a motion detection event occurs. It continues taking snapshots at the Snapshot Frequency value all during the motion event.
If you specify 2 SPL, then a snapshot is taken every 2 seconds. This value also requires some experimentation. You should coordinate it with the “Post Record” or “Post_REC” value you want for the motion detection event (see below). For example if you record 60 seconds of video when motion is detected, decide how many snapshots you want to save. If you want just the initial snapshot, you can specify 61 SPL and a second snapshot won’t be taken unless the motion event continues longer than 60 seconds. If you want a couple snapshots during each event, then choose 30 SPL. If you want as many snapshots as possible, choose 1 SPL. You must consider the bandwidth used to transfer so many snapshots to your server and the space they will occupy.
Motion Detect Event
Navigate to Event, Motion, Motion Detect and choose which camera to configure. Click the Enable checkbox. Set the Schedule to allow motion detection, then set the Area in the camera’s field of view that will trigger an event when motion is detected. You’ll have to experiment with the Sensitivity and Threshold settings there. Refer to the NVR manual.

Check the box to enable Channel recording, then set which camera or cameras should record when motion is detected. Usually you’ll want camera 1 to record if camera 1 detects motion, but you can have other cameras record instead, or in combination. If you don’t do this step, you won’t see Motion Detect indications during playback if you use continuous video recording. Or if you don’t record continuously, there will be no video at all to playback.
Choose the number of seconds you want the motion detect event to last in the Post_REC field. Coordinate this value with the “Snapshot Frequency” value as I discussed above. Anti-dither is the number of seconds to wait before generating another motion detect event, when motion is detected again. 4
Check the Snapshot check box and set which camera or cameras should take snapshots. You will probably want camera 1 to take a snapshot when motion is detected on camera 1, but you can also set other cameras to take snapshots simultaneously.
Motion Detect Event Schedule
Navigate to Storage, Schedule and check the yellow Motion Detect (MD) box. Then enable Motion Detect Events by filling in the schedule to allow them as desired. I recommend you also choose a Pre-record time to capture video just prior to whatever triggers a motion event. Sometimes a car will zoom by so fast, it will be out of view when the snapshot is taken. You can see it in the playback video if it includes sufficient pre-record time.

Click over to the Snapshot tab (Storage, Schedule, Snapshot). Check the Motion Detect (MD) box and likewise enable when to allow snapshots when motion is detected. Be sure to disallow continuous recording of snapshots or you will be transferring Megabytes and Megabytes of snapshots all the time. You will probably exceed the FTP bandwidth limit of your server. In this example, make sure there are no green lines representing continuous mode on your snapshot schedule.

For some reason there is yet another step to enable snapshots. Navigate to Storage, Record and click the Enable radio buttons to allow snapshot recording for your cameras as desired.

I’m not sure yet if the NVR starts an FTP session and keeps it open continually, or if it starts a connection, transfers a snapshot and closes the connection. At my web server, it doesn’t show that an FTP session is currently active.
Viewing the Uploaded Snapshots
In terms of automation, I wrote a script to display the snapshots uploaded from the NVR to my web server via FTP. The script generates a web page that shows snapshot images for a particular day. This provides a quick and easy way to see the snapshots. If I see something to investigate, I can note the time and use the playback feature back over on the NVR to review the actual motion event video. Most motion events can be dismissed by glancing at the snapshot. It is usually a bird or animal, or a car I already expected to see.
The script reads the sub-directories created by the NVR during the FTP transfer to determine the dates of the days available. These dates are added to a drop-down list and I can select one date to view. Once selected, the script gets a list of snapshot files in that sub-directory. The snapshot file name is encoded with the channel number and date and time it was taken:
NR908X_ch1_20190103152715_E.jpg
Here, “ch1” is the channel or camera number. This is followed by the date and time the snapshot was taken in year-month-day-hour-minute-second. The script parses the channel number and timestamp from the file name to construct a caption for each snapshot. The “_E,” which I ignore, seems to mean motion event. I’ve also seen “_T,” which might refer to another event besides motion, like “Tamper.” I have yet to investigate the different types of snapshots.
Since snapshot images are relatively large, the script first resizes them to create thumbnails. Thumbnail images are displayed in a list and I can select one thumbnail to see in detail, which is the original snapshot. It can be further enlarged to examine the view in more detail. To view another snapshot, I simply click another thumbnail and the page reloads with that snapshot.
Here is the simple user interface. The thumbnail highlighted in yellow corresponds to the large image shown at right. The images have been blurred for privacy.

The use of thumbnails significantly reduces the time needed to load the web page. Only a single large snapshot image is shown at a time. But, generating thumbnails is computationally time-consuming. If the script hasn’t run in a while and dozens of snapshots have been uploaded in the meantime, there is a long delay in loading the page. For this reason, I have a separate script that runs in the background. It attempts to generate thumbnail images for any new snapshots uploaded. This script runs every hour through an entry in my website’s “crontab” facility.
The script also checks the modification time of each snapshot. It skips processing a snapshot if the timestamp is too recent. This avoids processing a snapshot while it is actively being uploaded, which will result in errors and incomplete thumbnails and/or snapshots.
The final step is to delete the older snapshots from the web server periodically, say after a week. This gives me time to review recent activity and it frees up server space.
Fine-tune the Snapshot Frequency
You may be surprised at the number of snapshots generated due to the number of motion detect events that occur. Experiment with various settings to achieve an optimal frequency.
Adjust the four motion detect zones on each camera to avoid bushes and tree limbs that sway on windy days. Adjust the sensitivity and threshold of each zone to detect what you want to see and ignore everything else.
Adjust your motion-sensing outdoor lights to reduce their sensitivity to bugs, birds and windy conditions. Each time those lights go on and go off, it causes a motion detection event.
If your camera is in infrared (IR) night vision mode, fog will appear like a swarm of bugs flying around the lens. It causes continuous motion detection events and your FTP server will be flooded with hundreds of snapshots. You may wish to disable FTP processing altogether on foggy or stormy nights.
Likewise you may get fewer snapshots than expected. Suppose you want to capture every car that drives by. You could reduce the “Post Record” or “Post_REC” field on the motion event. It then won’t last as long. You may need to decrease the “Anti-dither” time so another motion event captures the next car that drives by. Alternately, you could reduce the “Snapshot Frequency” value (seconds per snapshot) so more snapshots are taken during a given motion event, in case another car drives by right after the last one. That results in more snapshots though.
Conclusion
The FTP feature is one way of saving snapshots taken during motion detection events. I sent mine to my website. I use a script to display them on a web page, and it is a simple matter to scroll through a list of thumbnail images. The date, time and channel (camera number) are shown. If necessary I can use the Flir Cloud Client program on my PC to see the corresponding video playback for any given motion detection event.
UPDATE: The scripts I describe in this article are now available for download. See How-To: Home Automation Scripts.
Footnotes
- Specifically I have model 4KHDIP86, which is described as “4K Ultra HD IP 8 Channel NVR System with 6 Outdoor 4K 8MP IP Cameras, 130FT Night Vision, 2TB Hard Drive.” The Network Video Recorder (NVR) is model NR908X, or specifically NR9082 with the 8-channel configuration.
- The configuration screen shots below are from the NVR web interface. Newer Internet browsers no longer support the NPAPI plug-in required to view live video and to playback video. However you can still use this interface to make configuration changes. You could also use the Flir Cloud Client on your PC, but it may not allow you to set all the same options. Of course you can use the NVR interface directly with a monitor or TV. However it is easier to show screenshots from the NVR web interface.
- The Flir Cloud Client does not allow you to choose “All.”
- The NVR web interface, shown here, does not allow you to set an anti-dither value. You’ll have to use the Flir Cloud Client program, or the NVR itself to set it.
THanks for the information. would you consider sharing your Script ? Im trying to create a wordpress page to display images from Lorex NVR … we have 6 cameras that upload to FTP site every minute. we are looking to display the second last of the 6 images on a webpage.
We have a working version written in ASP but we need to move to PHP and are looking to use wordpress for ease of management
Yes, I will post my scripts soon.
UPDATE: The scripts I describe in this article are now available for download. See How-To: Home Automation Scripts.
Thank you, Mike! I was looking at the manuals and they don’t mention FTP at all as far as I can see. I appreciate the level of detail you’ve provided here.
This is EXCELLENT!!! I setup FTP and like you said a lot of big files were sent when check boxes are checked. Rather than more trial and error I went to the manual only to find this specific subject was left out.
Hi Mike,
You seem to be the only person on the Internet who has gotten this to work! I’m hoping to follow in your footsteps. My situation is a little different in that I want to transfer video files to a network-attached storage device where I will be able to store around 30 days of video compared to about 5 days on the built-in drive.
After completing the FTP settings, I did a test using the default channel 1 and the current day, but selecting continuous. I was almost shocked when a video file immediately began to transfer to the NAS. I then changed the NVR FTP settings to send all channels (16) on all days. Back on the NAS, I noticed that only about half of the channels began to transfer. Of those, about 4 channels recorded until the file size was between 700-850 MB and then stopped. The remaining channels all stopped well before that, with one stopping after 15 MB.
When I went back into the FTP setup, I noticed that the channel was reset to 1 and the days were reset to the current day. This happened every time I went out and came back to the FTP screen so I’m not sure if it really does reset or if it’s just the display; either way it’s clearly a bug.
I did the one channel test again and it started to send the file. Then I tried all channels and nothing was sent. I retried one channel; nothing. I restarted the NVR and tried one channel; nothing. I’ve tried several times and I can’t get it to do anything. The test connection still works but no files are sent.
I spent an hour on the phone with Support who had no idea what FTP was and kept telling me that I needed to call FTP for support.
I know this isn’t much to go on, but I’m hoping you might have run across something that will help me get over this hurdle. Any ideas?
Thanks,
Brian
I would bet the NVR software cannot handle such bandwidth. Perhaps for a few channels, but not for 16. It’s probably all it can do to record real-time on its own disk. I noticed that when I transferred video to my Internet server, my normal Internet browsing slowed way down. Granted, upstream data to my service provider is only a fraction of the download speed, but it still affected it without any larges files downloading. Since your NAS is within your local network, you should be at full speed. Perhaps it is a router issue. Also, I don’t think FTP was intended for video transfer. Perhaps setting a larger packet size, and more concurrent sessions on your FTP server, would help. Make sure your FTP file length option on the NVR is set to zero (unlimited size).
Sounds like you should upgrade to a larger disk in your NVR, and/or install a second disk. I think you can set it to mirror to a second disk. Or, divide up the channels so half get recorded to one disk and half to the other, giving you more days of storage.
I’ve noticed that options seem to change mysteriously. Just “looking” at options can change them. It doesn’t always read the current value on some options and instead shows the default value, or the value from the previous channel. So if you click OK without making any changes, you might actually be changing something. Check all the values for correctness before dismissing the screen.
I have to reboot the NVR occasionally, and always after a momentary power failure. In my case the snapshot mode seems to mysteriously change from “trigger” to “timing,” which stops snapshots being transferred to my FTP server. Sometimes the NVR’s FTP facility gets tired and just stops working. Rebooting solves this. It may be something at my server though, that interrupts the connection such that the NVR can’t recover it.