
I’m disappointed. After using my LT155 Lawn Tractor once or twice a week for six months every year for 19 years, the drive belt gave out. Although it didn’t break, it finally cracked enough become too loose. Luckily it slipped off the transmission just as I finished mowing the yard. Yes, I should have changed it proactively much, much earlier.
The new belt didn’t come with instructions and the owner’s manual only describes how to change the mower blade drive belt, which I had already done years ago. I did find an article online by blizzardj. 1 But I want to provide my own take on the procedure with additional advice and clarifications. If you have the tools, ability and agility, you can change your own drive belt in one or two hours, for just the price of a new belt (about $30 at my local John Deere dealer).
You can download and print these steps. You will be prompted for a user name and password. The user name is Guest and the password is deere.
https://home.iSeeAncestors.com/access.php?file=005583.pdf
Tools Needed

Safety glasses
Mechanic’s gloves
Trigger clamp (like one shown here)
Vice grips or locking pliers
Old flat head screw driver or pointed pry bar
13mm socket and ratchet wrench, deep socket or with extender
2 new cotter pins to replace old ones if necessary
Digital camera or smartphone to remember parts orientation
Old putty knife and air compressor to clean out old grass clippings
Remove Mower Deck
Follow the instructions in the owner’s manual to detach and remove the mower deck from under the tractor. It needs to be out of the way to access the power train drive belt.
Clean the Underside
There can be quite a bit of old grass clippings and dirt accumulated in the hidden ledges and crevices under the tractor. Use an old putty knife, screwdriver and/or air compressor to poke around. Clean it before beginning to avoid a face full of dust while you’re working on it.
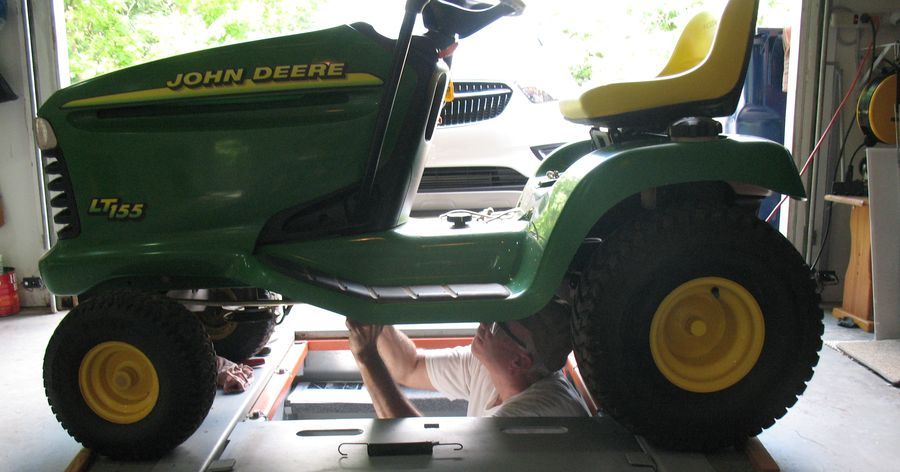
Park the Tractor
Position the tractor on a level surface and chock all four wheels so it can’t roll. Release the brake lever. I have a storm shelter in the garage floor. I parked the tractor over it, such that I could sit comfortably underneath it. You can also lie on your back on the floor. Please wear safety glasses.
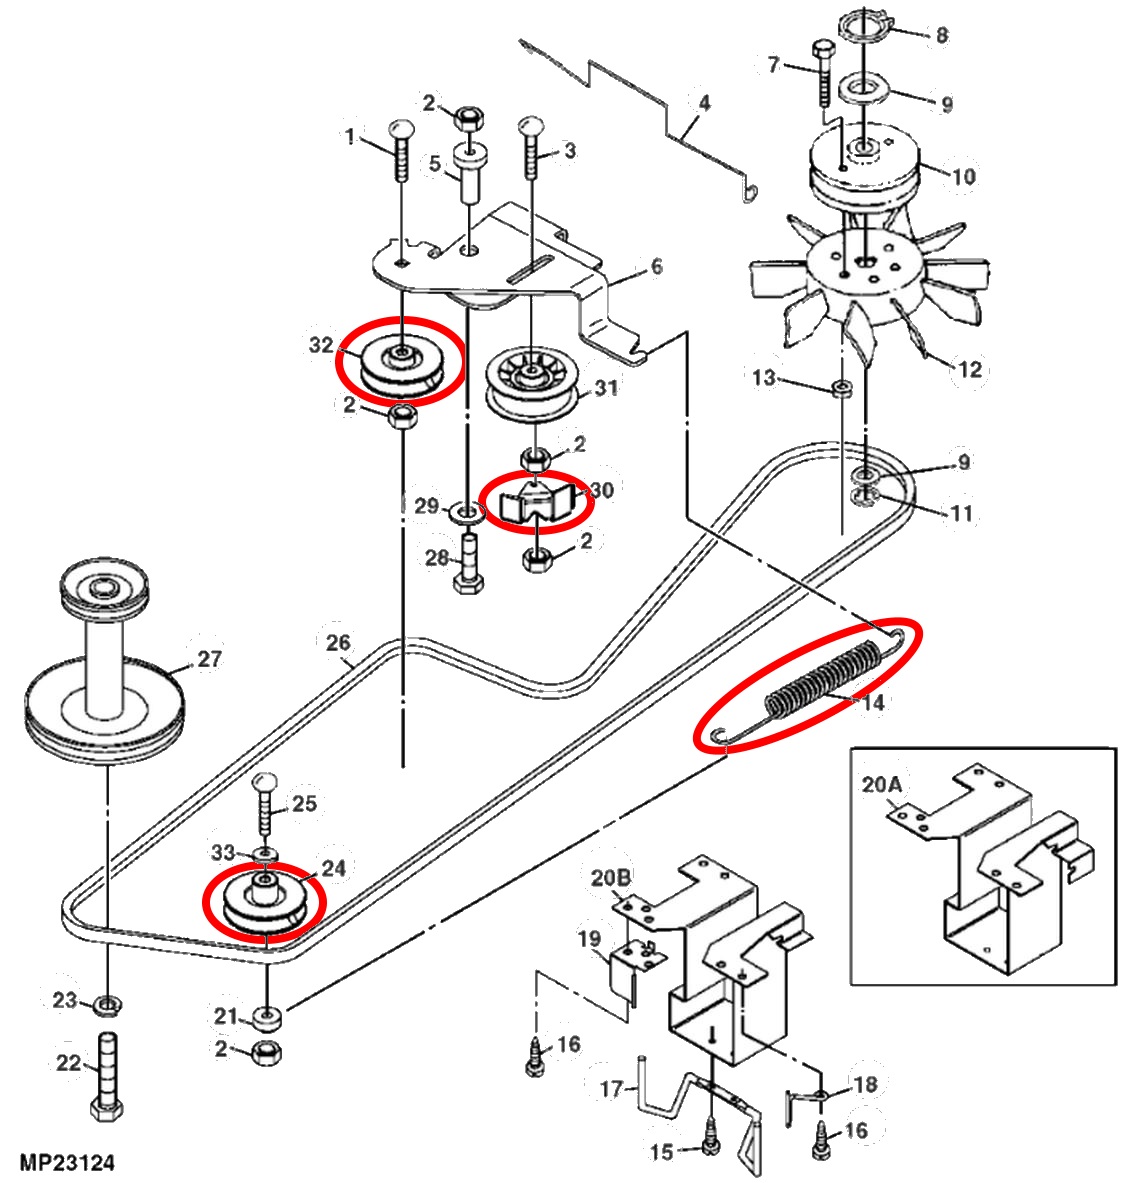
Parts Reference
In the pictures that follow, I refer to various parts using the same numbers on the John Deere parts diagram. 2 In summary, you’ll have to remove the parts I circled here in red, as well as detach one end, but not remove, each of the two steering tie rods.
Remove Tension Spring
Start by removing the tension spring (14). Wear gloves and safety glasses. Use a trigger clamp to help relieve tension on the spring. Place one jaw on the notched arm shown, and the other jaw on the nearby steel crossbar. Use vice grips to lock onto the straight wire at the other end of the spring (not shown) and pull enough to remove it from the bushing under the idler (24). Wear gloves to avoid scraping your hands.

Remove Belt from Transmission
Once the tension spring is released, remove the belt from the pulley (10) over the transmission (not shown) and through the guide (4).
Remove the Idler
The other end of the tension spring (14) is hooked onto the idler (24) against the left side of the tractor’s frame. Once the spring is removed, use a 13mm socket to remove this idler. The bolt can be pushed upward to more easily remove the idler and belt together.

Disconnect Tie Rods
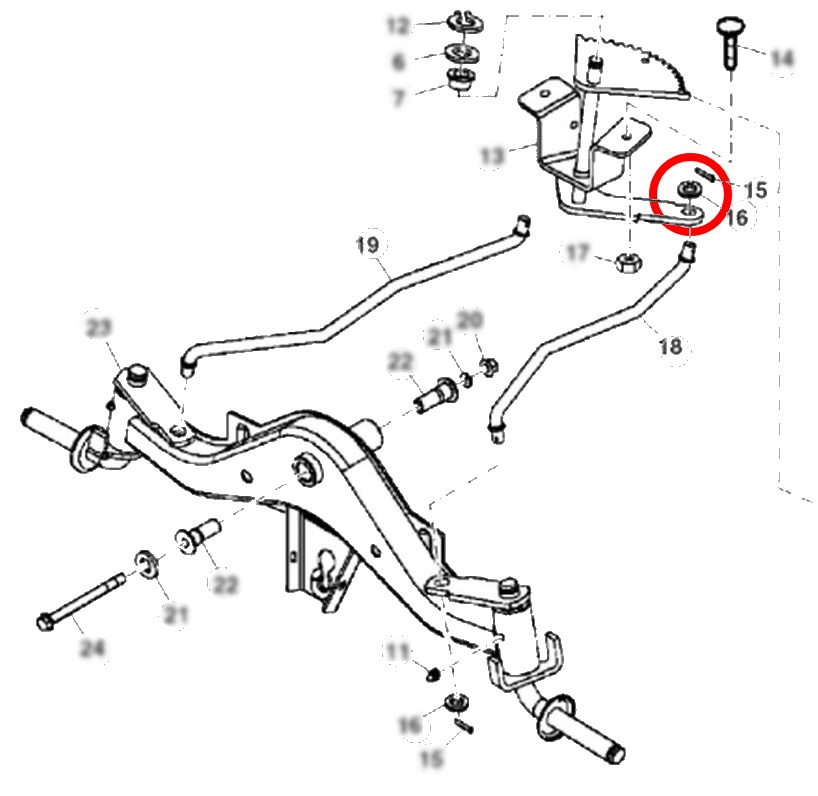
Next unhook both tie rods (18, 19) from the steering column by removing the cotter pins (15) and washers (16). You will probably need new cotter pins when you reinstall the tie rods later. You could instead remove the tie rods from the wheels at the front if that’s easier. But don’t remove both ends of the tie rods.
(This parts diagram is just to show the cotter pins on the steering tie rods. Disregard all other part number references here and refer instead to the Parts Reference diagram earlier.)
Remove Belt from Engine
Remove the belt from the upper pulley (27) assembly under the engine (not shown). Fish the belt through the guides (17) and over the loose ends of the two steering tie rods (not shown).
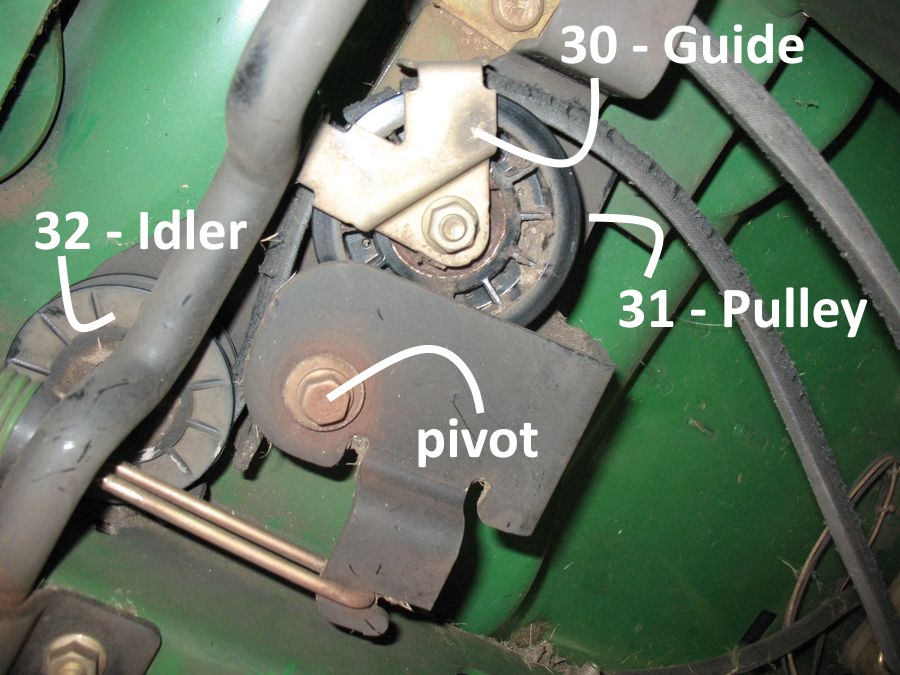
Disassemble the Idler/Pulley
The final steps to remove the old belt involve the S-shaped idler/pulley assembly in the middle of the underside of the tractor.
Before you remove the guide (30), take a digital picture of it so you can refer to it when you reinstall it. Notice how it lines up with the other parts of the arm (6). I’m not sure it makes a difference, but I was careful to reinstall mine in the same orientation.
Now remove the guide (30) attached to the pulley (31), but do not remove the pulley (31) itself. Next pivot the assembly so the idler (32) comes into view. Don’t loosen the pivot bolt. Remove the idler (32). You should be able to get enough of the socket on the nut to loosen it. The steel crossbar is slightly in the way.
Fish Out the Belt
Once it is free of all idlers, pulleys and guides, you can remove the belt by pushing it up and over the flat vertical bar shown. (The spring shown here would not be attached.) Notice the notch in the frame that is just big enough to fit the belt through. You can then fish the whole belt down through the hole in the frame just visible in this view, top right.

Install New Belt
Install the new belt by fishing it up through that hole in the frame, where you just removed the old belt. Then pull the left side of the belt over and down through the notch in the frame.
Route the new belt over the loose steering tie rods, through the guide (17) and onto the upper pulley (27) under the engine.
Route the new belt through the guide (4) and onto the pulley (10) at the transmission.
Route the new belt between the frame and the idler (24) at the same time you reinstall the idler (24) and bushing, along the left side of the frame.
Route the new belt through the S-shaped idler/pulley assembly while reinstalling the idler (32), then reattach the guide (30) to the pulley (31). Refer to the digital picture you took earlier to properly align the guide (30) in relation to the arm (6). The outside (back) of the new belt rides on the pulley (31) while the inside of the belt rides on the idler (32).
Check that the new belt is routed properly through all guides, idlers and pulleys. It has a tendency to slip off the transmission or engine pulleys as you route it other places.
Reattach the steering tie rods, using new cotter pins if necessary.
The last step is to reattach the tension spring (14). First ensure the other spring, the one that stretches between brake pedal shaft and the idler/pulley assembly, is positioned in the correct notches. It has a tendency to slip out of those notches when you pivot the idler/pulley assembly. You cannot get proper tension on the belt unless the brake spring is in those notches.
You cannot apply enough force to attach the tension spring by hand. Use a trigger clamp between the “Clamping Points” shown in the photo above. This puts a fair amount of tension on the new belt. You can then use an old screw driver or pointed pry bar to leverage the spring over and slip the end on the bushing on the idler (24). Wear gloves and safety glasses as you do this.
Footnotes
- Blizzardj, “How to Change the Traction Belt on a John Deere LT155.” Instructables (https://www.instructables.com/id/How-to-change-the-traction-belt-on-a-John-Deere-LT/ accessed June 2020).
- John Deere, “LT155 Lawn Tractor – PC2607” (https://partscatalog.deere.com/jdrc/ accessed June 2020).
i replaced the drive belt after starting and letting off brake it would burn the belt up
Perhaps the belt is not routed properly, the belt tension is too tight, or a bushing is not turning freely. Check that the spring is connected properly at both ends.
Interesting reading. I recently mowed through some water and now my drive doesn’t grab. It can crawl forward on the flat but backwards won’t happen at all. Is this a symptom of a worn drive belt?
You can check if there’s tension on the belt, but if it were slipping, I’d expect to hear a squeal. Sounds like water may have gotten in the transmission.
Hi there I’m working on a LT 180. Is the routing the same?
Thanks Mike, My neighbours LTR155 has just trashed the drivebelt. Not sure how, there are bits of it wedged everywhere. I assume the diagram at the start is the routing of the thing. Ordered new belt. Have had a look and there dose not seem to be any damage up there. Does seem to be a bit of a faff of a job. thanks for the above steps, they will be invaluable.
Paul Llewellyn
I put new belt on and now it won’t loosen up clutch pushed in or not really confused… What did I do wrong I’ve watched the video probably at least 20 time’s. Help me please this is my steep bank mower.
thank you for the idea of using the trigger clamp I’ve been struggling with putting that spring on it made it so much easier to take off and put on. I know this is an old post, but I had to respond to it also saved this post to my favorites.
Hi Mike,
I’ve tried to find any information on the Mowing Belt, how to tension that (but also the diagram). It looks quit loose, although when I engage the mower blades it works fine, but still sometimes it slipped (I smell the odor of rubber melting).
Can you help?
The mower belt will be loose when not engaged. When it slips or you smell rubber, one of the spindles is probably getting ready to fail, or has seized. It’s easy enough to install a new spindle yourself.
Hello, I just put a new drive belt on my John Deere LT155 and the belt seems loose and the foward and reverse pedals are limp. Do I need to crank the mower before I will have tension on the belt and pedals? Any advice you can give me would be greatly appreciated. Thank you!
Mike liked your article on install lt 155 transmission belt on John Deere what is Item. Number and size of belt. Your help would be greatly appreciated. Thank you bill
It’s best to check part numbers and specific details at your dealer or the John Deere website.
I know this is an old post but I’m hoping you see this and will respond. I can’t get the new belt over the brake prawl and can’t really tell where to fish it through from your picture. Any chance I could get a picture taken a bit higher up to see exactly where you’re talking about please? TIA
Hi Vicki,
Sorry, I no longer have the LT155. On mine, there was just one notch (pictured) through which I could fish the belt upward. It was just big enough to fit the belt. If you’re on a level surface and have the wheels blocked, try releasing the brake to get some more room.