
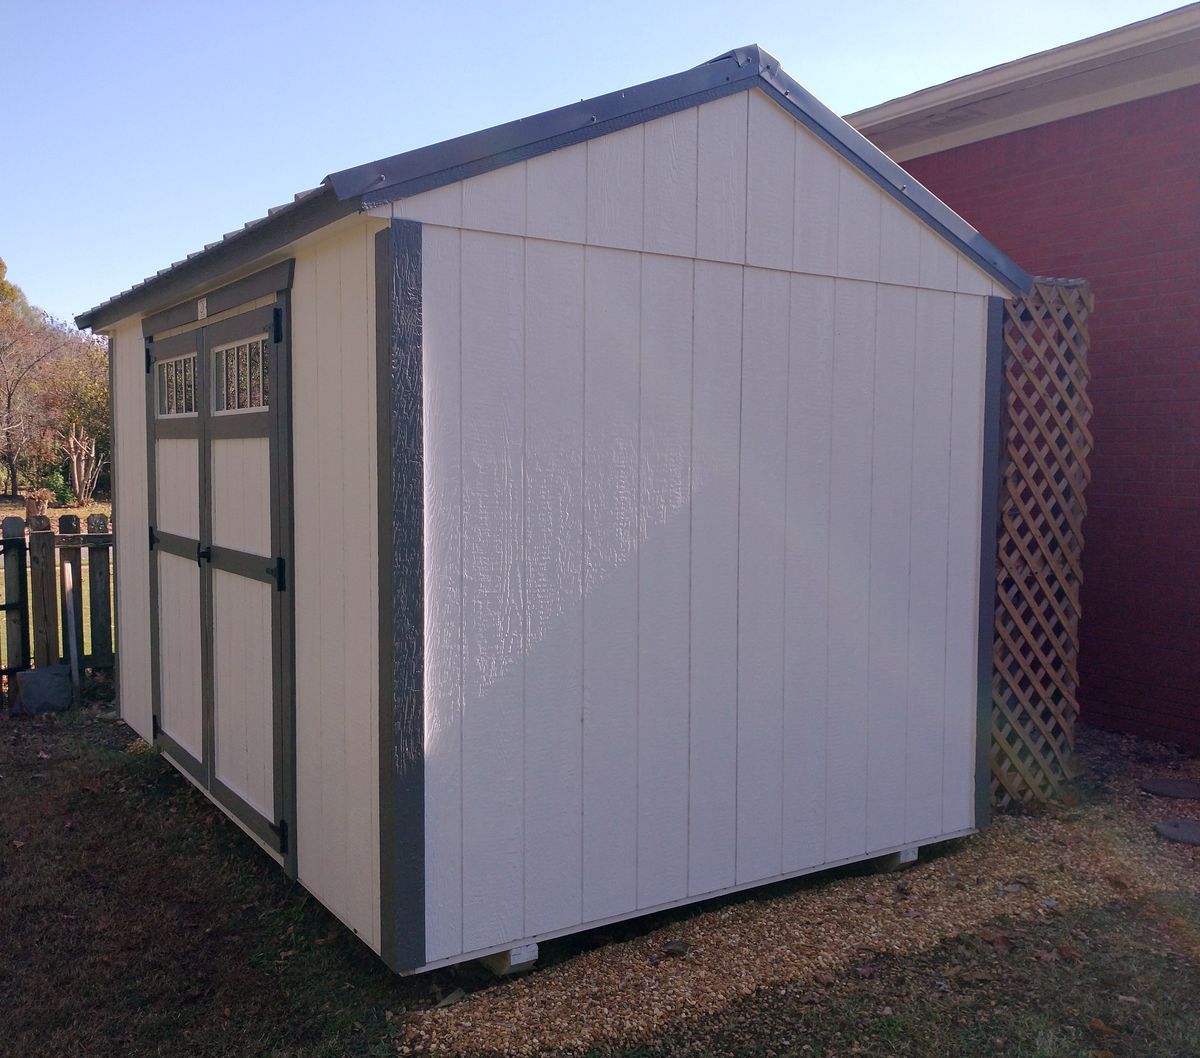
I’m quite happy with our new 8’x12’ backyard garden shed. Here are some things to consider when installing a new portable shed.
Our shed seems well-constructed and sturdy. 1 Of course portable sheds use more “economical” building materials. Most all use oriented strand board (OSB) paneling. If it gets wet inside, the wood will likely buckle and disintegrate, but regular plywood has a similar problem. I plan to prime and paint the interior to help it last a few more years. There are also some edges with exposed end grain outside. I will periodically touch those up to reduce the absorption of moisture.
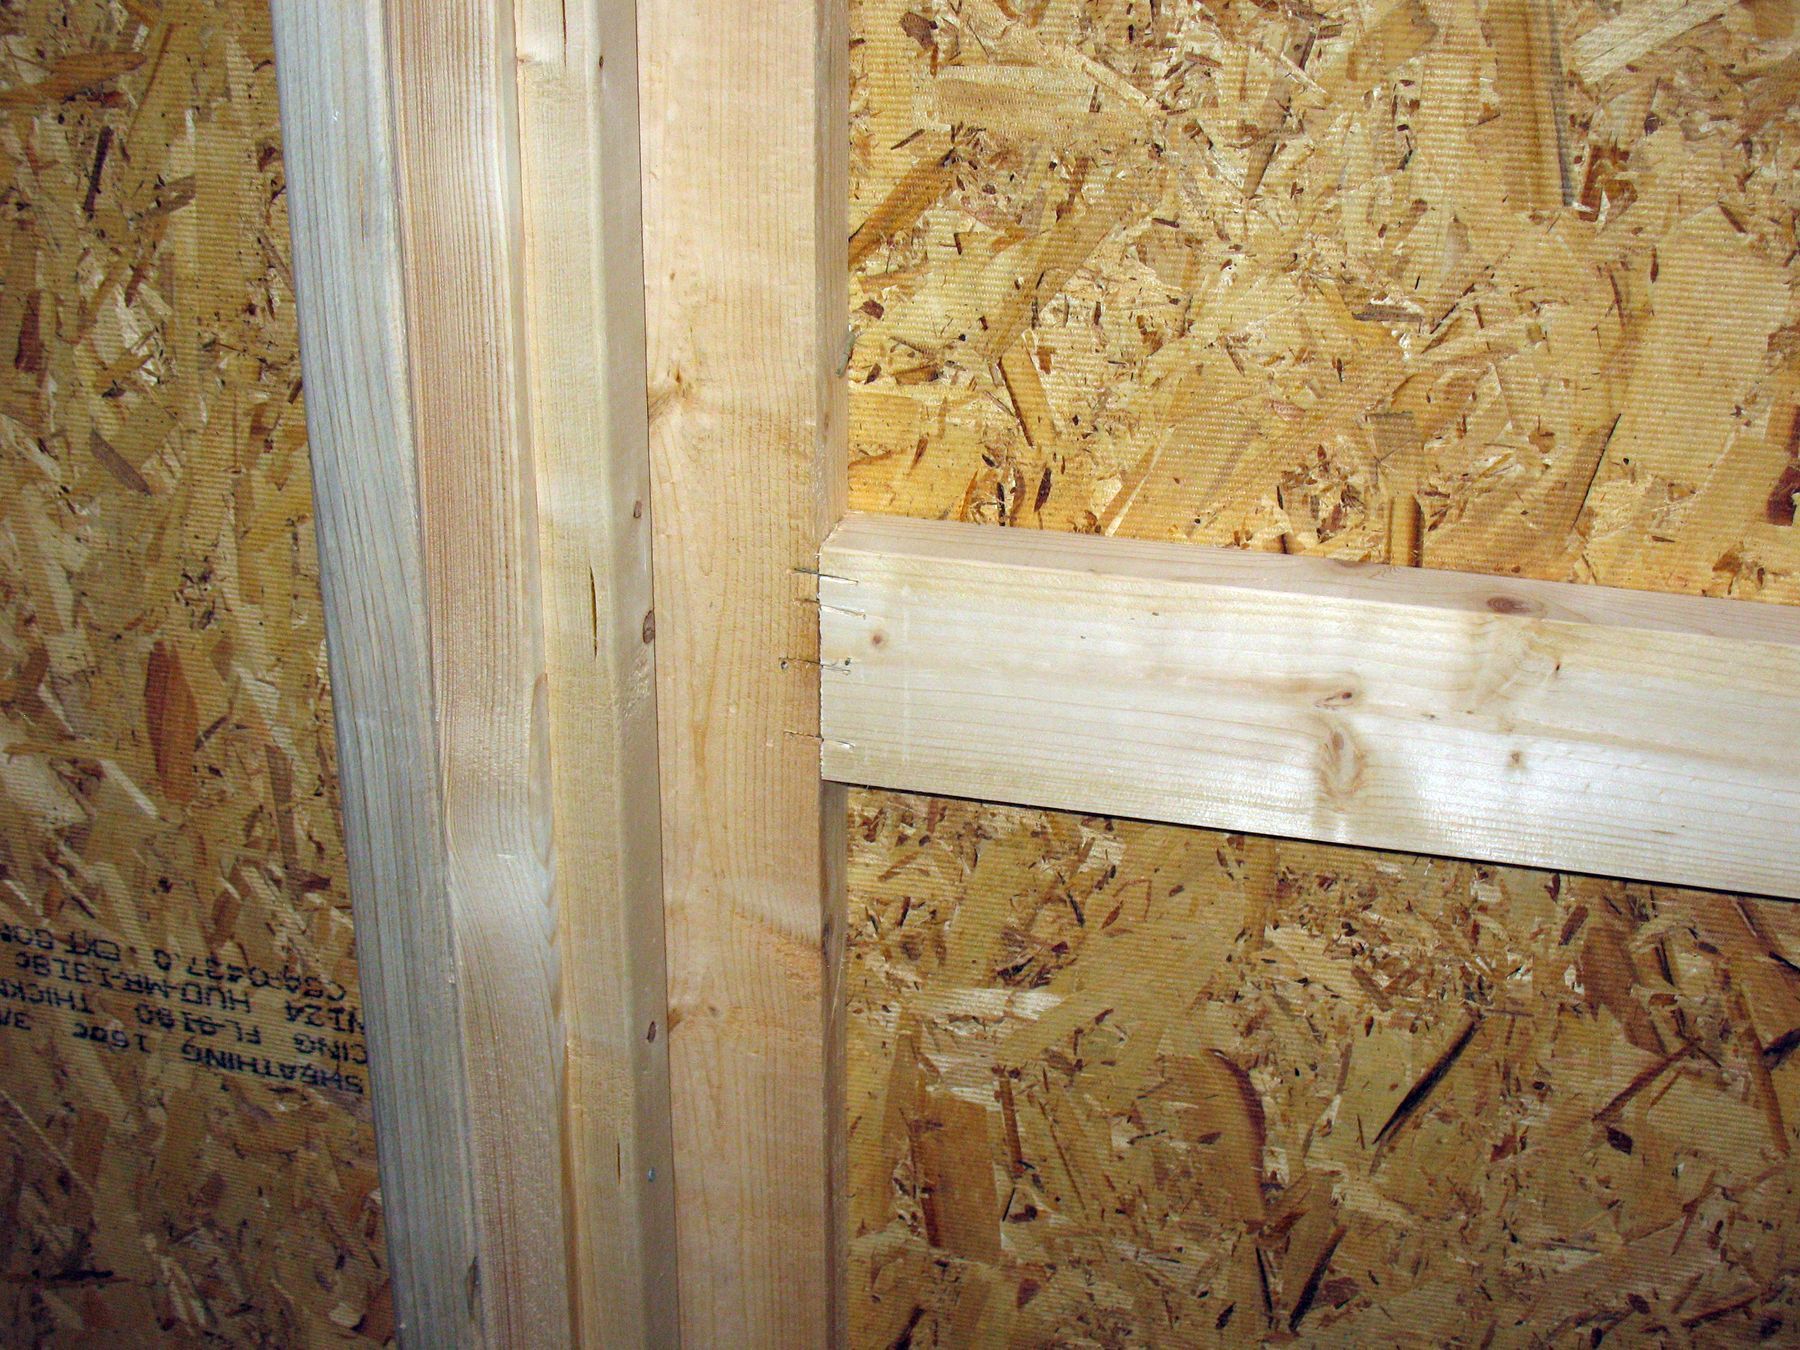
Most manufacturers use staples rather than nails or screws for some joints. I suppose staples can be just as good, but it seems cheaper quality. My shed walls have a double top plate. The top board is even a 2×8 that forms the exterior soffit as well. That’s a good detail. They don’t seem to use construction adhesive because I still see an air gap in places.
The roof is metal and well ventilated, which I much prefer to shingles. The floor is coated with an LP brand “SmartFinish” rather than just the OSB or plywood I see on some sheds. Those at the home stores had gotten wet and their floors were a shambles of loose OSB particles. Hopefully the SmartFinish will be durable and I’ll do my best to keep it dry.
Out with the Old
The new shed replaces a plant house I designed and built twenty years ago. It was basically a pole barn, with lattice sides, flat roof, a potting counter with dry sink, and a shelving unit for pots and dirt. Although it could have lasted another twenty years, it was being used less and less. I thought about converting it to an enclosed shed, but with the effort and materials involved, we thought a portable shed would be better.
I deconstructed two thirds of the plant house, but kept the rear shelving portion. It’s still useful for storing outdoor items, and one shelf now serves as a small potting table. I pressure washed everything. I then shortened its height, and moved the horizontal supports and lattice from the outside rear to what was the interior, in effect turning it inside out.

In with the New
The new shed now sits where the majority of the plant house once stood. The yard gently slopes away from the garage so I graded the area to keep that slope. I called the salesperson at Watson to ask for some key measurements from the shed. After measuring for the best location next to the remaining plant house, I dug two shallow trenches where the shed’s bottom skids would be placed. One end of the furthest trench from the garage is simply at the existing ground level. I continued digging that trench, keeping the bottom level from one end to the other and square with my garage wall. This shallow trench was my base line.
The second trench is closer to the garage, and thus slightly up-slope. I started it such that it’s bottom was level with the starting point of the first trench. I continued the second trench, keeping it’s bottom level along its length. I also kept its bottom level with the bottom of the first trench. When I finished, the end of the second trench was the deepest point because it was at the highest point of the yard’s slope.
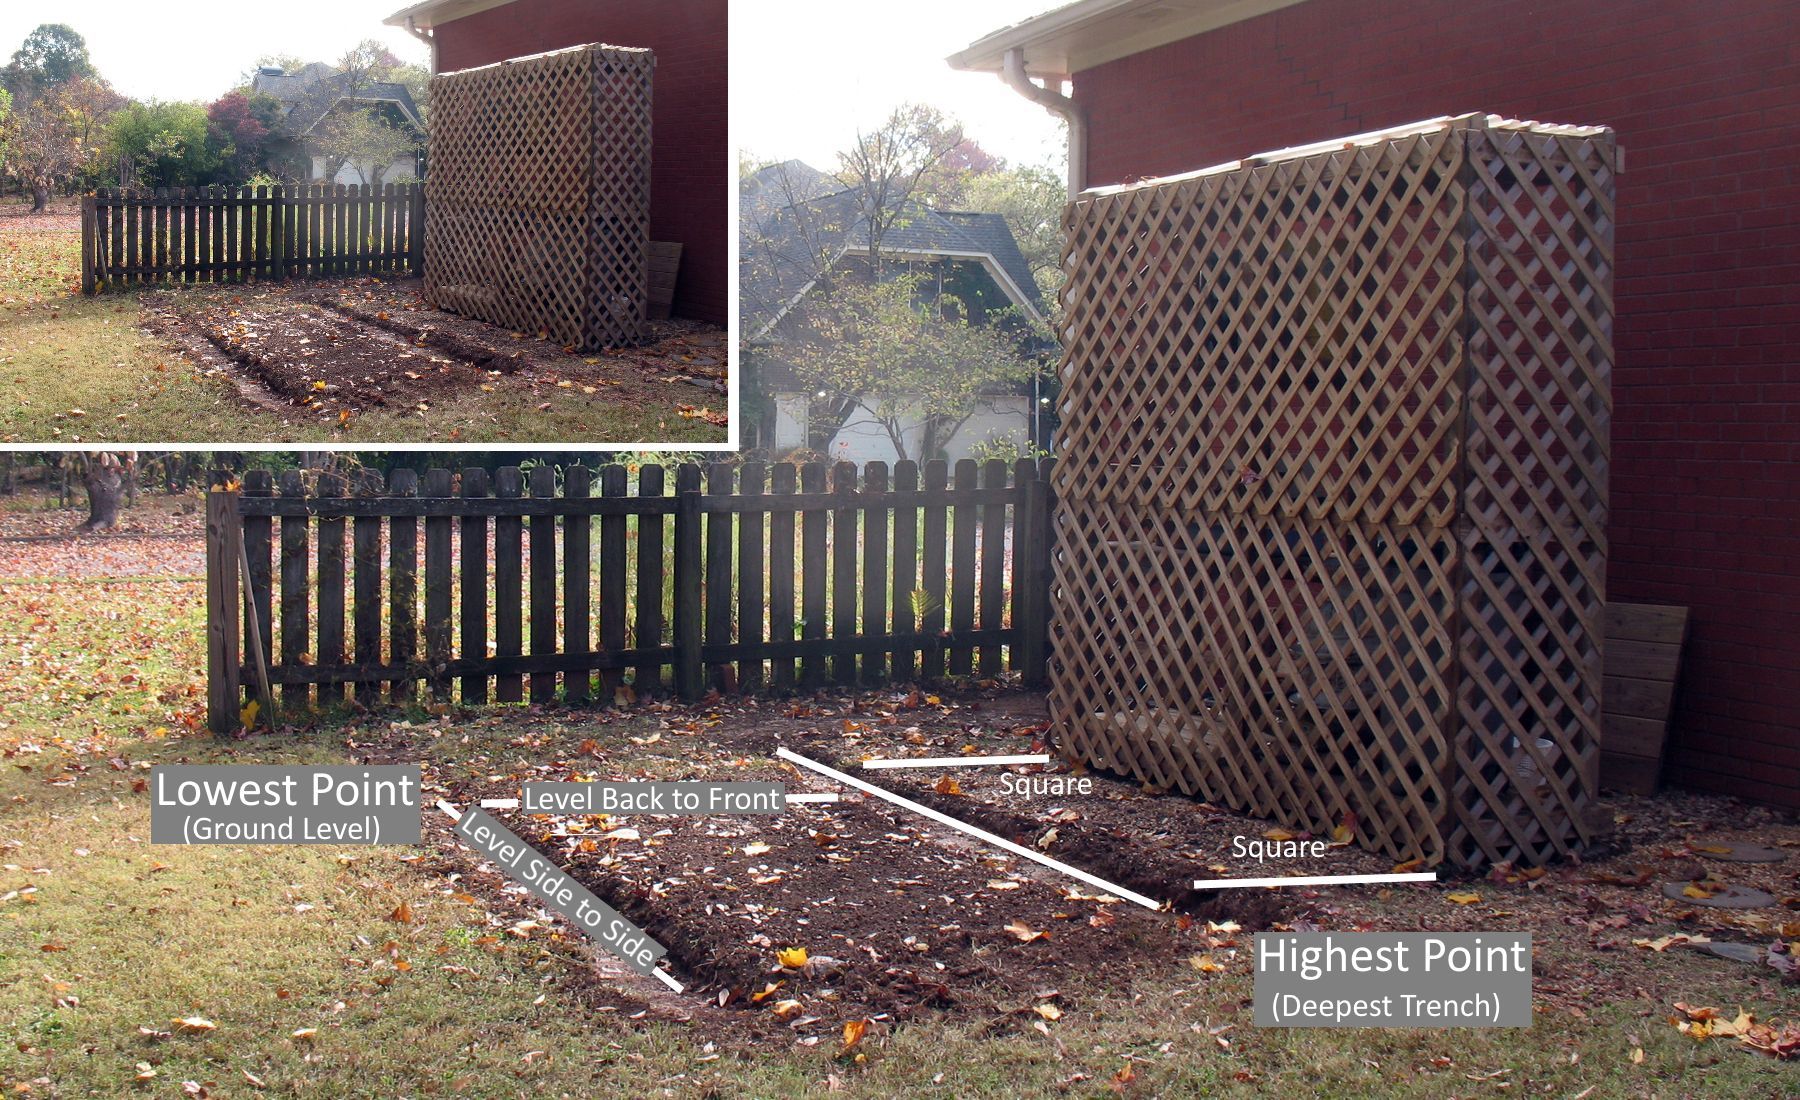
All my measurements were my “best guess” because I wasn’t quite sure what to expect. (I wish they had provided a sheet of recommendations.) I had to account for variations, so I made the trenches wider than they needed to be. I was told the skids would rest on cement blocks. I assumed they would be standard 8x8x16 blocks, but when the delivery person arrived, he had an assortment of 4x8x16 and 2x8x16 solid cement blocks. Luckily I kept my trenches less than 8 inches deep so the shed would still be above ground. We ended up using a 4x8x16 at the deepest point and the shed still rested above ground.
Note that the delivery person uses wooden wedges where necessary to level the shed. Therefore the skid may not actually rest directly on a cement block. As those wedges age, they will probably have to be replaced to keep the shed plumb.
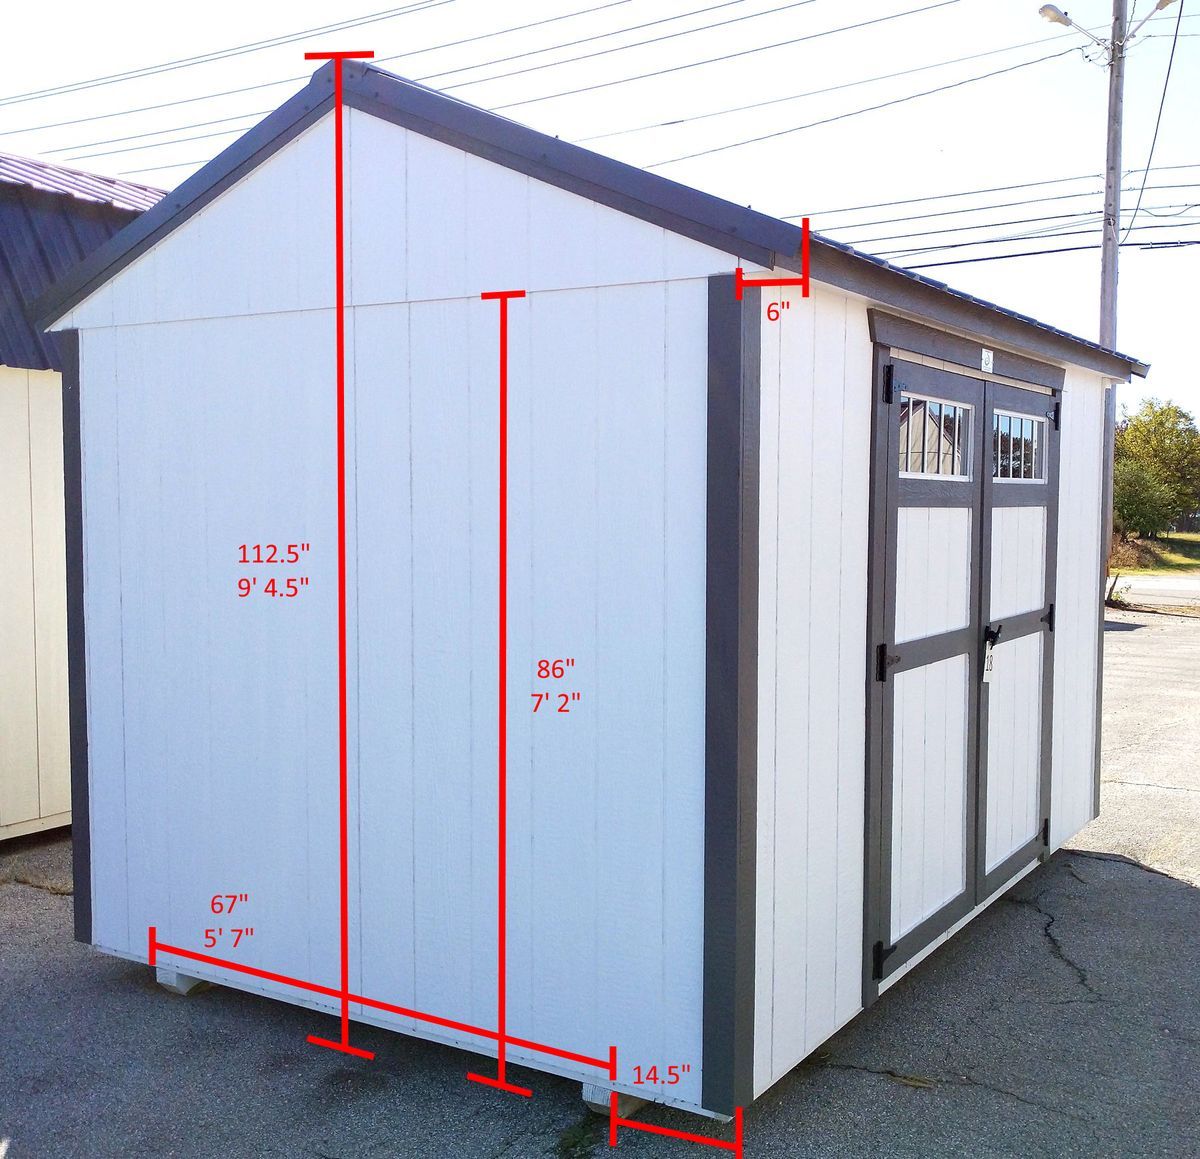
With my pre-dug trenches the shed rested at the minimum height possible above ground. Without the trenches, the blocks at the lowest point would be twice as high. The height of the shed’s threshold now stands at 13 inches above ground level.
If you dig trenches, their depth depends on the slope of your yard and how many cement blocks you will use. There are other options, like a bed of gravel, but I can’t speak to those alternatives. My main objective was to keep the shed as low as possible and have the skids on the underside still above ground. If your situation is out of the ordinary, definitely discuss it with the seller.
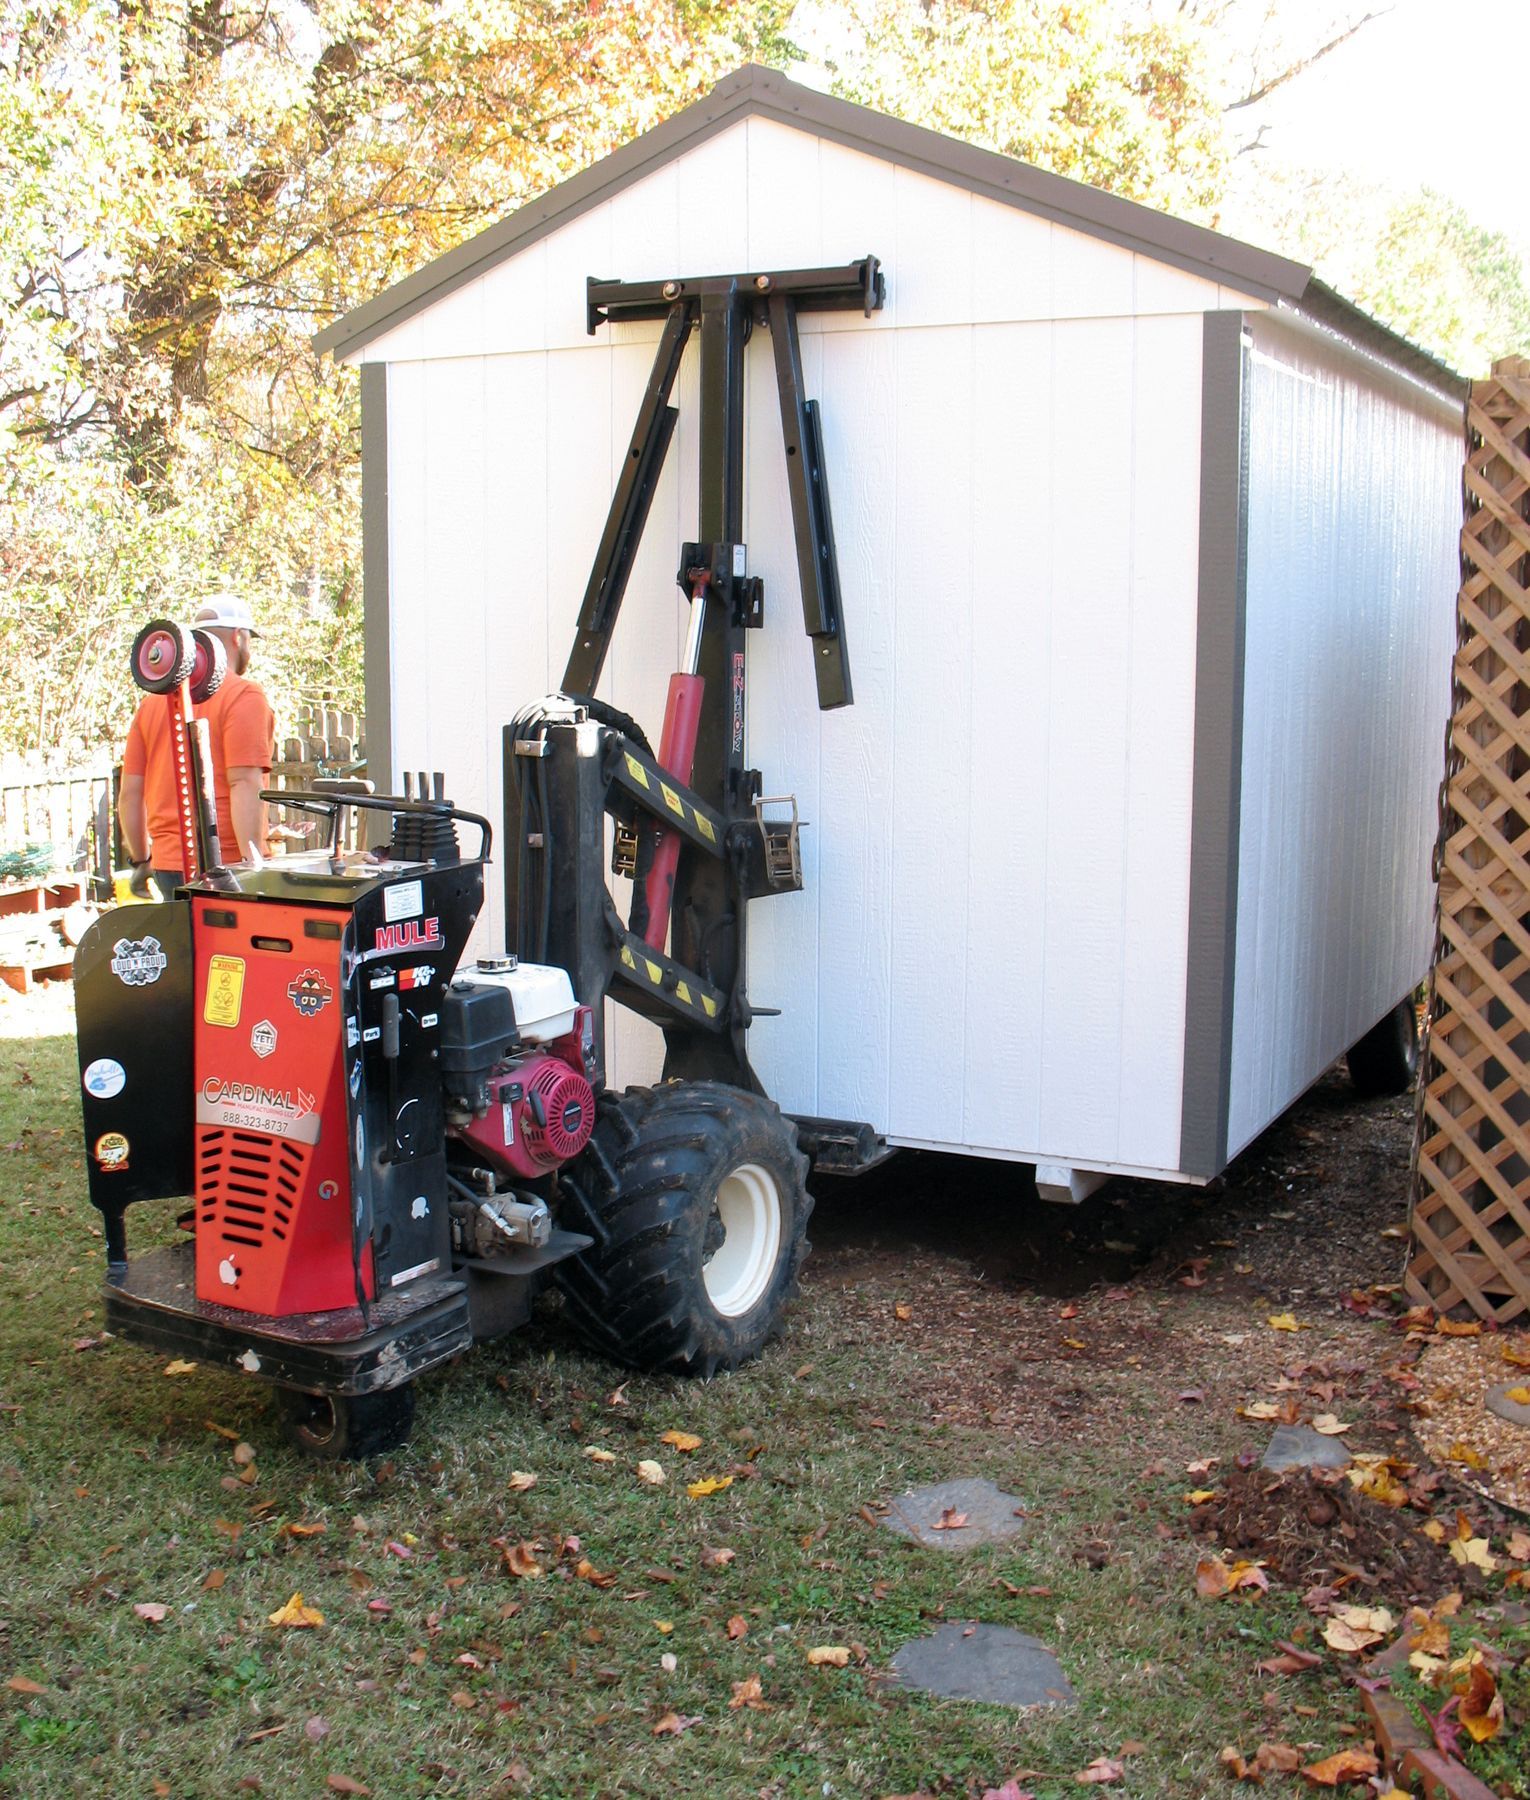
The delivery person steered the shed easily into position using a motorized “mule.” All my predetermined measurements were spot-on. The shed wall rests 18 inches from the back of the remaining plant house. I accounted for the overhang of the shed’s soffit and a little more for the roof edge. It’s just enough to walk between the shed and the plant house.
Ramping Up
My riding lawn mower now has a new home in the shed. At first I though I’d build a wooden ramp for it. I decided its slope should be less than a 14% grade. For a height of 13 inches, it would need to be 8 feet long. I wanted something I could remove and store when not in use. Therefore a removable wooden ramp that size was out of the question. A permanent wooden ramp would also take far too much room in the yard.
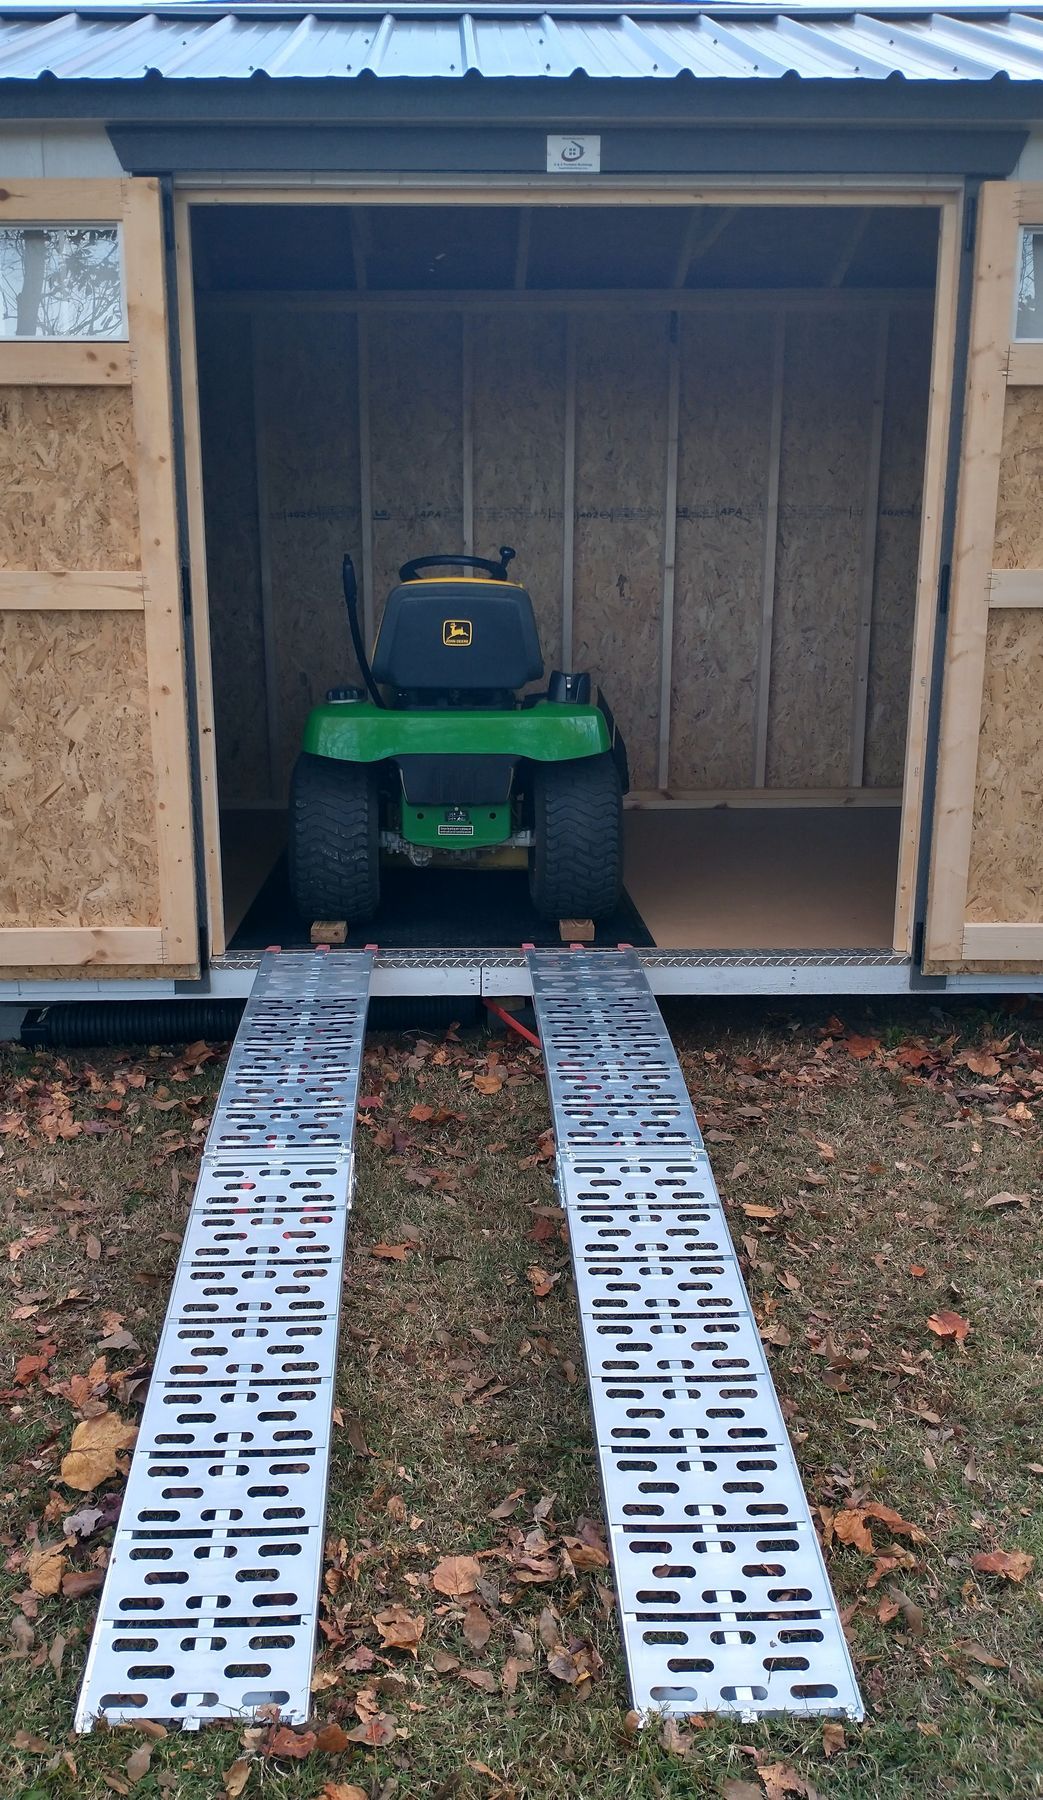
I decided on aluminum ramps, like those used to load ATVs or motorcycles onto trailers and pickup truck beds. I didn’t see anyone on the Internet use them for sheds, but they turned out to be an ideal solution. They’re 7.5 feet long, lightweight, and fold conveniently for storage in the shed. Problem solved.
If you opt for aluminum ramps, check their maximum height requirement. Your shed’s threshold shouldn’t be higher. Also check the width of a ramp will accommodate your mower’s tire width, and that your front and rear tires are in line with each other. Some mowers might track differently, meaning if the front tires are on the ramps, perhaps the rear tires won’t be. Also check the maximum weight capacity for the pair of ramps. It should accommodate the mower, its attachments, gas, and your body weight.
The ramps come with anchoring straps to ensure the ramp does not move away from the threshold as you drive the mower in. You definitely should use them. I don’t trust the plastic-tipped fingers that rest on the shed’s threshold. I installed an anchor hook to the underside of the shed under each ramp. They’re sturdy and out of sight.
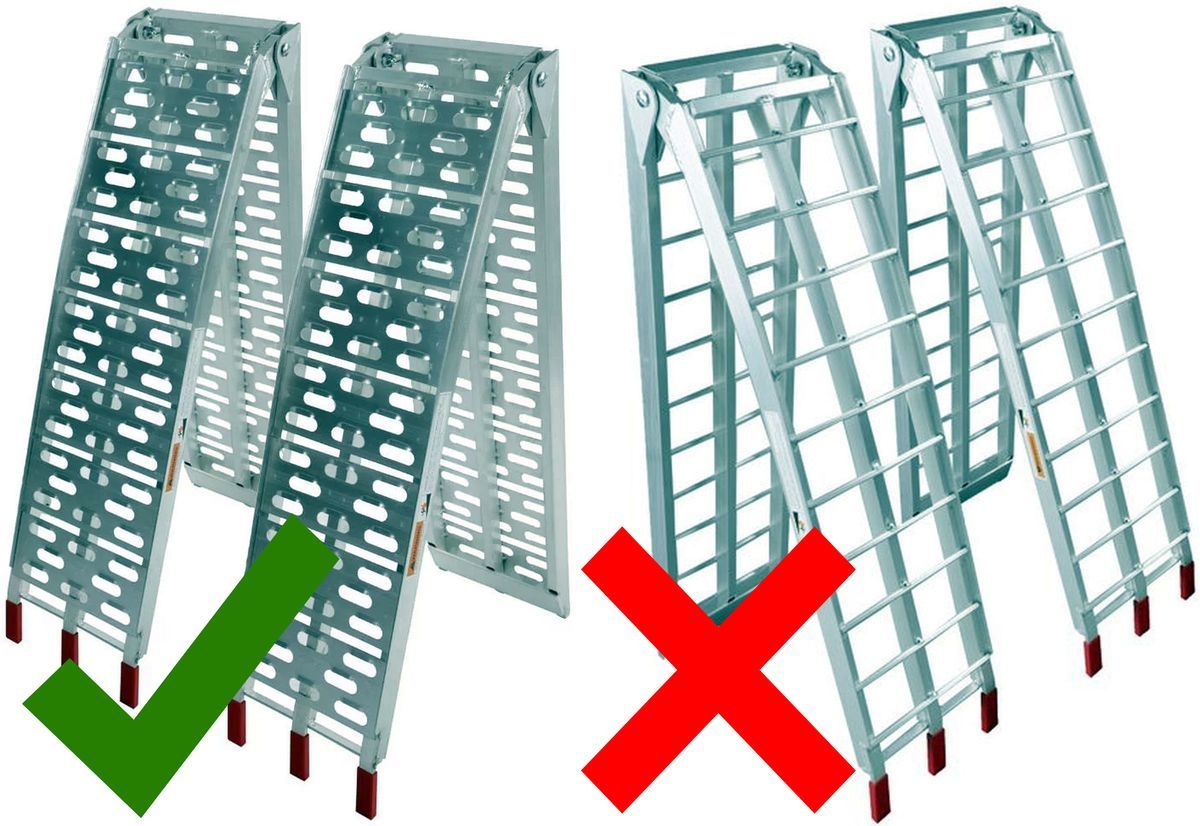
I opted for ramps with a more solid surface, rather than thin ladder-type rungs. They’re easier to walk on, and to move a wheelbarrow or hand-truck over. This ramp even works great over a curb to use with a wheelbarrow.
An important consideration is your mower’s hydrostatic transmission, if so equipped. Some mowers lose power going up a steep grade, either forward or backward. If the grade is too steep, you might not be able to use your ramps. On mine, I have to get a little momentum going and drive upward at a slow, steady pace. I just keep my eye on the front wheels to be sure they’re centered on the ramps. If I stop part way up, or go backward up the ramps, my mower cannot do it. It’s too dangerous to manually push a mower up or down the ramp.
You may need longer ramps to reduce the grade from 14% to 10% or even 5%. The less expensive 36- or 48-inch ramps will likely be too steep for a threshold higher than a few inches. And, the mower deck may bottom out on the threshold. Hopefully you can test your mower at various slopes to see if this will be a problem. Perhaps your neighbor has a steep driveway. Check out this elevation calculator.
Also check the shed’s door width against the width of your mower deck. On many sheds, a single door is not wide enough. You may need a double door.
Let There be Light
I also installed a solar shed light. I chose one that has a day-time motion sensing mode. Even on a sunny day, the corners of the shed can be dark. I simply attached the solar panel to the top of the plant house and ran the wire over to the shed. I drilled a hole on the underside of the soffit at a position to come out inside next to the center rafter. I fished the wire up and into the shed. I then stuffed some foam backer rod in the hole to keep bugs out. You may wish to install the solar panel on the shed and drill directly through a wall and use silicone sealant.
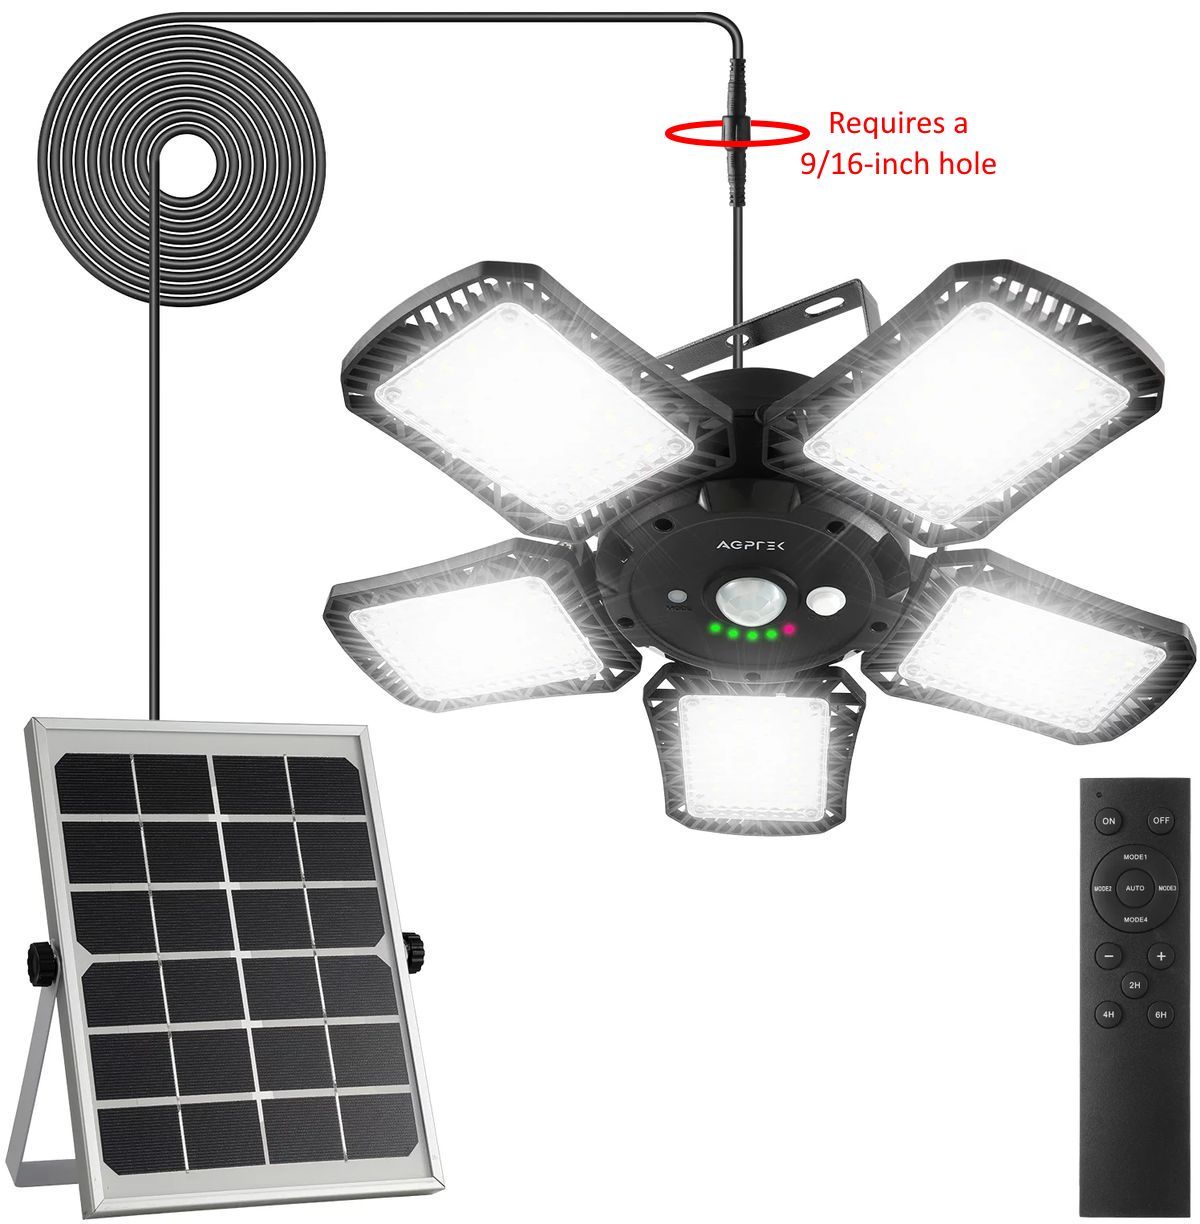
My light has a design flaw however. The wire from the solar panel is connected to the lamp using a weather-proof screw cap. However the cap is on the wire coming from the solar panel and not on the wire from the lamp. That means the hole in the shed must be 9/16 inch, which is huge. A typical drill bit set goes up to 3/8 inch, so you’ll need a spade bit for this hole.
I didn’t want such a large hole in the shed, so I opted to use the minimum size necessary to fish the wire through and left the screw cap outside. I plugged that wire into the lamp inside and simply used electrical tape to secure the connection. Since the lamp is inside, complete weather-proofing is not necessary.
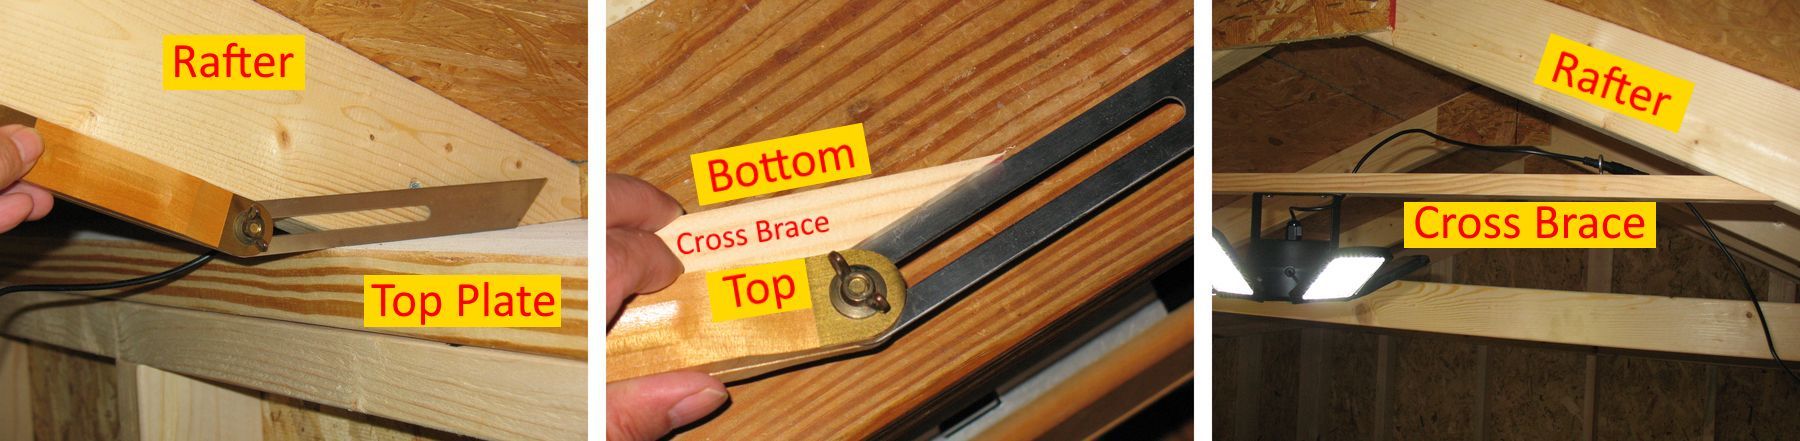
I installed a cross brace at the center rafter pair and attached the lamp to it. First I determined the slope of the rafters, and traced that line on a piece of 1×2. I measured the distance from each side of the rafter, such that the lamp would hang above the plane of the “ceiling.” In my case that was 3 feet. I cut the 1×2 at the correct angle, measured 3 feet and cut the same angle for the other side.
I drilled a hole to fish the lamp’s wire upward and even placed a screw eye to keep the wire horizontal on the top side of the brace. I mounted the lamp on the cross brace, then installed the whole assembly on the rafters by simply leveling the cross brace. The angled ends give a neat appearance.
Devil in the Details
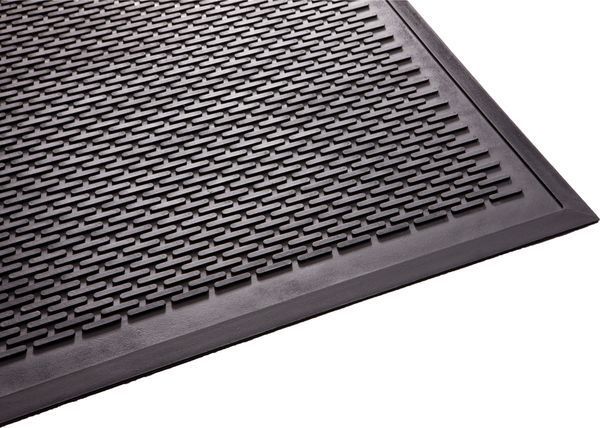
There are a few more minor details to address. I wanted to protect the shed floor under the mower. I always hose off the grass clippings under the mower deck before storing it. The inevitable drips afterward lead to dirty stains on the floor. I found the perfect rubber mat that’s durable, stays put, and is easily cleaned. It’s 4×6 feet and fits nicely under my mower to include the whole mower deck and tires.
To be extra safe, I place wooden wedges behind the tires to prevent the mower from rolling out on its own. The transmission may fail, or I may forget to engage the brake, and I don’t want 500 pounds rolling over anyone or my pets.
I installed screw eyes on the bottom corner of each door, and outside under the shed. I can attach a rope or bungee cord to keep the doors wide open and prevent the wind from slamming them against the shed.
You will likely want to install your own lock hasp and padlock. The existing door handle is lockable, but a simple turn of a wrench will easily break it. Of course a thief can also just remove the door hinge pins or unscrew the hinges. A real padlock may discourage neighborhood kids from mischief though.
Conclusion
I provided some ideas to consider and what to expect when installing a portable shed. A little preparation may keep your shed at the lowest possible height above ground, and avoid a surprise that your mower can’t make it up a steep ramp.